Devops Tooling And Diagnostics
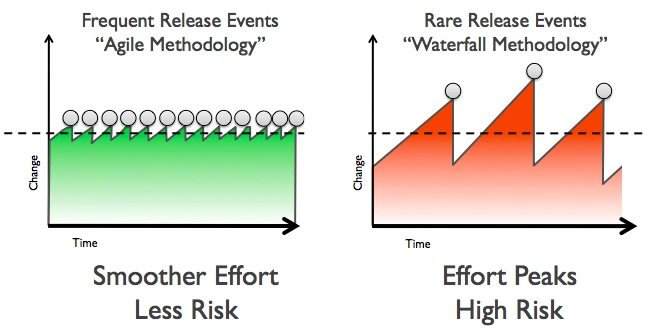
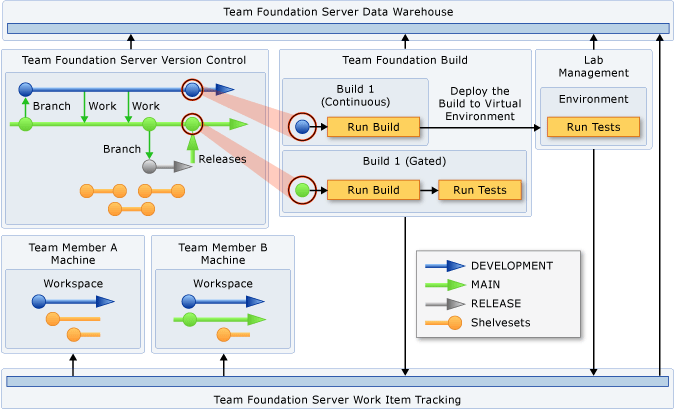
Continuous Integration Pipeline
CI build pipeline
can be used to automate various tasks for an Angular/React web app, such as building, testing, and deploying the application
- https://medium.com/@tonistiigi/advanced-multi-stage-build-patterns-6f741b852fae
- https://docs.docker.com/develop/develop-images/multistage-build/
CI Pipeline
lint/fix, build, test, and deploy,script, beforeInstall and afterSuccess
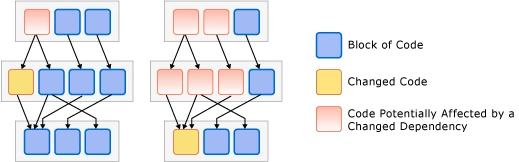
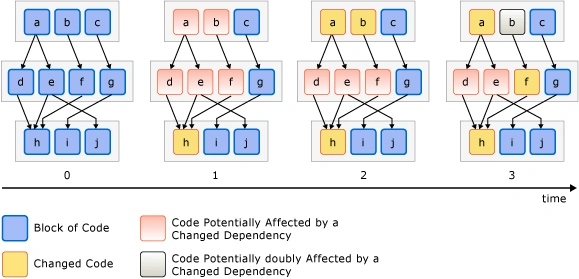
Managing Code Dependencies
environment password build agent
tools
tools {
nodejs 'node 9.8'
}
stages
- install
stage('install') {
steps {
sh "npm i"
}
lint/fix
stage('lint') {
steps {
sh "npm run lint -- --ci;"
}
}
build
stage('build') {
steps {
sh "npm run build:prod"
}
}
add platforms
stage('cordova add platforms') {
when { expression { buildCordova(params.BUILD_CORDOVA) } }
steps {
sh "rm plugins/ios.json"
sh "rm plugins/android.json"
sh "npm run cordova -- platform add ios"
sh "npm run cordova -- platform add android"
}
}
build platforms
        stage('cordova:build:ios') {
            when { expression { buildCordova(params.BUILD_CORDOVA) } }
            steps {
                sh 'security unlock-keychain -p "\${JENKINS_SVC_PASSWORD}"'
                sh "npm run build:ios -- --device --debug";
            }
            post {
                success {
                hockeyApp applications: [[  downloadAllowed: true, filePath: '**/*/ShopRite.ipa', mandatory: false, notifyTeam: false,
                            releaseNotesMethod: manual(isMarkdown: true, releaseNotes: '# [\${BRANCH_NAME}:\${BUILD_NUMBER}](\${GIT_URL})\n - [Build Results](\${BUILD_URL})\n '), uploadMethod: appCreation(false)]], debugMode:
                            false, failGracefully: false, baseUrl: "https://rink.hockeyapp.net/api/2/"
                }
            }
        }
        stage('cordova:build:android') {
            when { expression { buildCordova(params.BUILD_CORDOVA) } }
            steps {
                sh "npm run build:android";
            }
            post {
                success {
                    hockeyApp applications: [[  downloadAllowed: true, filePath: '**/*/app-debug.apk', mandatory: false, notifyTeam: false,
                        releaseNotesMethod: manual(isMarkdown: true, releaseNotes: '# [\${BRANCH_NAME}:\${BUILD_NUMBER}](\${GIT_URL})\n - [Build Results](\${BUILD_URL})\n '), uploadMethod: appCreation(false)]], debugMode:
                        false, failGracefully: false, baseUrl: "https://rink.hockeyapp.net/api/2/"
                }
            }
        }
}
test deploy
beforeInstall afterSuccess
GitHub Actions
Docker and GitHub Actions can be beneficial for a static Node.js web app in several ways:
- Consistent Development Environment: Docker allows you to encapsulate your application, its dependencies, and the required runtime environment into a container. This ensures that your app runs consistently across different development machines. Developers can easily set up the required environment by running the Docker container, eliminating the need for manual environment setup and potential compatibility issues.
- Portability and Deployment: Docker containers are portable, meaning you can run them on any machine that supports Docker, regardless of the underlying operating system. This portability makes it easier to deploy your static Node.js web app to various environments, such as development, staging, and production. You can package your app and its dependencies into a Docker image, which can be deployed consistently across different environments, reducing deployment-related issues.
- Isolation and Security: Docker containers provide isolation, ensuring that your static web app runs independently of other applications and services on the host machine. This isolation helps prevent conflicts between different apps and enhances security by limiting the container's access to the underlying host system. By using Docker, you can isolate your app and its dependencies, reducing the risk of interference and potential security vulnerabilities.
- Version Control and Continuous Integration: GitHub Actions allows you to define automated workflows for your static Node.js web app. With GitHub Actions, you can easily set up a continuous integration (CI) pipeline that automatically builds and tests your app whenever changes are pushed to the repository. This ensures that your app remains in a working state and helps catch any potential issues early in the development process. By combining GitHub Actions with Docker, you can build and test your app in a consistent and reproducible environment, ensuring reliable results across different stages of the CI pipeline.
- Scalability and Collaboration: Docker and GitHub Actions enable scalability and collaboration in the development and deployment of your static Node.js web app. Docker containers can be easily scaled horizontally to handle increased traffic or workload demands. GitHub Actions provides a platform for collaboration among team members, allowing them to contribute code, review changes, and trigger automated workflows. This collaboration and scalability help streamline the development process and enable efficient teamwork.
In summary, using Docker and GitHub Actions for a static Node.js web app provides benefits such as consistent development environments, portability, isolation, security, version control, continuous integration, scalability, and collaboration. These tools enhance the efficiency, reliability, and maintainability of your app throughout the development lifecycle.
Docker
Dozzle
Containerization
The most common way of explaining the role of containers in the DevOps context is to consider where the name originated: from shipping containers. Prior to the standardization of shipping containers, if you wantedto transport goods across the ocean, you would package your cargo in a variety of forms ranging from placing it on pallets, storing it in boxes or barrels, or simply wrapping it in cloth. Loading and unloading goods that arrived packaged in all these different ways was inefficient and error- prone, mainly because There'sno single kind of crane or wheelbarrow that could effectively move all of the cargo.
Compare that haphazard approach to deploying a standardized shipping container where the boat and port operator can work with a single form factor, using standardized equipment and shippers and a single, flexible form of packaging for all of their goods. Historically, the usage of standardized shipping containers unlocked a paradigm shift that reduced costs of global shipping by orders of magnitude. Packaging software in a standardized container that can be run on any system in the same way provides an analogous advancement in capability and efficiency.
The most common way you'll interact with containers is through a software system called Docker. Docker provides a declarative programming language that lets you describe, in a file called Dockerfile, how you want the system set up i.e., what programs need to be installed, what files go where, what dependencies need to exist. Then you build that file into a container image which provides a representation of the entire file system specified by your Dockerfile. That image can then be moved to and run on any other machine with a Docker-compatible container runtime, with the guarantee that it will start in an isolated environment with the exact same files and data, every time.
Container Management Best Practices
Design Containers to Build Once/Run Anywhere
Build the container once (say, in CI) so that it can run in your various environments production, development, etc. By using a single image, you guarantee that exactly the same code with exactly the same setup will transition intact from development to production.
To achieve run-anywhere with your containers, extract any differences between environments to runtime container environmental variables.
These are secrets and configurations like connection strings or hostnames. Alternatively, you can implement an entrypoint script in your image that downloads the necessary configuration and secrets from a central secret store (e.g., Amazon or Google Secret Manager, HashiCorp Vault, etc.) before invoking your application.
An additional benefit to the runtime secret/configuration download strategy is that it's reusable for local development, avoiding the need for developers to ever manually fetch secrets or ask another developer to send them the secret file.
Build Images in CI
In the spirit of reproducibility, I encourage you to build your images using automation, preferably part of continuous integration. is ensures the images are themselves built in a repeatable way.
Use a Hosted Registry
Once you're building container images and moving them around, you'll immediately want to be organized about managing the built images themselves. I recommend tagging each image with a unique value derived from source control, perhaps also with a timestamp (e.g., the git hash of the commit where the image was built), and hosting the image in an image registry. Dockerhub has a private registry product, and all the major cloud platforms also offer hosted image registries.
Many hosted registries will also provide vulnerability scanning and other security features attached to their image registry.
Keep Image Sizes as Small as Possible
Smaller Docker images upload faster from CI, download faster to application servers, and start up faster. The difference between uploading a 50MB image and a 5GB image, from an operational perspective, can be the difference between five seconds to start up a new application server and five minutes. That's five more minutes added to your time to deploy, Mean Time to Recovery/rollback, etc. It may not seem like much, but especially in a hotfix scenario, or when you're managing hundreds of application servers these delays add up and have real business impact.
Dockerfile Best Practices
Every line or command in a Dockerfile generates what is called a layer effectively, a snapshot of the entire image's hard disk. Subsequent layers store deltas between layers. A container image is a collection and composition of those layers.
It follows then that you can minimize the total image size of your container by keeping the individual layers small, and you can minimize a layer by ensuring that each command cleans up any unnecessary data before moving to the next command.
Another technique for keeping image size down is to use multi-stage builds. Multi-stage builds are a bit too complex to describe here, but you can check out Docker's own article on it at ctohb.com/docker.
Container Orchestration
Now that you've got reproducible images of reasonably small size managed in a hosted registry, you have to run and manage them in production. Management includes:
- Downloading and running containers on machines- Setting up secure networking between containers/machines and other services- Configuring service discovery/DNS- Managing configuration and secrets for containers- Automatically scaling services up and down with load- There are two general approaches to container management: hosted and self-managing.
Hosted Container Management
Unless your requirements are unique or your scale is very substantial, you'll get the highest ROI from going with a hosted solution that does the bulk of the work of managing production containers for you. A common and fair criticism of these solutions is that they tend to be considerably more expensive than self-managed options and provide fewer features and more constraints. In exchange you get dramatically less overhead and less complexity, which for most startups is a tradeoff well worth making. Most small teams lack the expertise to effectively self-host, and so self-hosting ends up either requiring a substantial time investment for existing team members or forcing you to hire an expensive DevOps specialist early on. Spending an extra $1,000 a month to avoid either of those problems is likely to deliver very good ROI.
Some common hosted container platforms include Heroku, Google App Engine, Elastic Beanstalk, Google Cloud Run. Vercel is another popular hosted backend solution, though it does not run containers as described here.
Self-Managed/Kubernetes
The most popular self-management solution for containers is called Kubernetes, often abbreviated K8s. Kubernetes is an extremely powerful and flexible, and thus complicated, system. The learning curve is steep, but the benefits and ROI are worthwhile if you're at the point of needing to self-manage your containers.
If you're considering going this route, I strongly advise against learning Kubernetes on the job. Especially for a team leader, it's too much to take on and do well on an ad-hoc basis. Instead, I recommend buying a book on Kubernetes and committing a week or two to reading it and setting up your own sandbox to get up to speed before diving in for a professional project. It's also a good idea to seek out an advisor or mentor who has a good understanding of Kubernetes to act as an accelerator for your learning of the tool.
FROM THE CREATORS OF MS AZURE LINUX TEAM. Docker gives a way to run multiple applications in parallel. Each application runs on its own secure environment, isolated from the main application and from other Docker instances.
docker-containers-vs-vms.webp)
Containers
- OS Isolation
- cgroup
- process space
- network space
- Namespace Isolation
- User Container Object
Basics
Platform: the software that makes Docker containers possible.Engine: client-server app (CE or Enterprise).Client: handles Docker CLI so you can communicate with the daemon.Daemon: Docker server that manages images, containers, networks, and volumes.Volumes: persistent data storage.Registry: remote image storage.Docker Hub: default and largest Docker registry.Repository: collection of Docker images, e.g. Alpine.Docker Volumes: best way to store persistent data your apps create and consume.Docker Image: immutable template used to create containers.
Using Docker for React Native iOS app development provides a consistent and isolated environment for building and testing your app across different development machines. It simplifies the setup process by encapsulating the required dependencies and tools within a Docker container, ensuring consistent builds and reducing environment-related issues.

Scaling
Networking - connect containers together Compose - time saver for multi-container apps Swarm - orchestrates container deployment Services - containers in production
Virtual Machines
(Advantage) Hypervisor Isolation (disadvantage) OS per Application
Virtual machines are the precursors to Docker containers. Virtual machines also isolate an application and its dependencies. However, Docker containers are superior to virtual machines because they take fewer resources, are very portable, and are faster to spin up.
It may look like a virtual machine at first but the functionality is not the same.
Unlike Docker, a virtual machine will include a complete operating system. It will work independently and act like a computer.
Docker will only share the resources of the host machine in order to run its environments.
Dockerfile
A Dockerfile is a file with instructions for how Docker should build your image.
FROM ubuntu 18.04

# Install Dependencies
FROM: specifies the base (parent) image.LABEL: provides metadata and maintainer context.ENV: sets a persistent environment variable.RUN: runs a command and creates an image layer.COPY: copies files and directories to the container.ADD: copies files and directories to the container and can unpack local.tarfiles.CMD: provides a default command/arguments for an executing container.WORKDIR: sets the working directory for subsequent instructions.ARG: defines a variable passed at build time.ENTRYPOINT: provides command and arguments for an executing container.EXPOSE: documents an exposed port.VOLUME: creates a mount point for persistent data.
Podman
daemonless container management engine for docker-compatible containers using terminal.
Tools
| Commands | command |
|---|---|
| to check if a VM exits | podman machine list |
| to remove unused images | podman image prune |
| to remove stopped containers | podman prune |
Podman and Docker are both powerful container engines that adhere to the Open Container Initiative (OCI) standards, meaning they can generally run the same container images. However, they have fundamental architectural differences that lead to distinct benefits for Podman, particularly in certain use cases.
Here are the key benefits of using Podman over Docker:
-
Daemonless Architecture:
- Docker: Relies on a long-running background daemon (
dockerd) that manages all container operations. The Docker client communicates with this daemon. - Podman: Is daemonless. Each
podmancommand directly forks and executes the container processes. This means:- No Single Point of Failure: If the Docker daemon crashes, all running containers are affected. With Podman, if the
podmancommand itself crashes, your running containers continue to operate independently because they are child processes of the user's shell orsystemd. - Simpler Process Management: There's no separate daemon process to monitor or troubleshoot.
- Faster Startup/Teardown: Without the overhead of communicating with a daemon, Podman can sometimes launch containers slightly faster.
- No Daemon as Root: A significant security benefit (see below).
- No Single Point of Failure: If the Docker daemon crashes, all running containers are affected. With Podman, if the
- Docker: Relies on a long-running background daemon (
-
Enhanced Security (Rootless Containers by Default):
- Docker: Traditionally, the Docker daemon runs with root privileges. While Docker has introduced a "rootless mode," it's not the default and can be more complex to set up and manage compared to Podman.
- Podman: Designed from the ground up to support rootless containers as a primary feature and default mode of operation. This is a major security advantage:
- Reduced Attack Surface: Running containers as an unprivileged user significantly reduces the potential impact of a container breakout or a vulnerability in the container engine. If an attacker gains control of a rootless container, they don't automatically gain root access to the host system.
- Better Audit Trails: Since containers are run directly by the user, Linux auditing systems (
auditd) can accurately track which user launched which container, providing a clearer security log. - No Privileged Daemon Gateway: In Docker's daemon model, the daemon itself can be a target for attackers trying to escalate privileges. Podman eliminates this central privileged component.
-
Strong Integration with Systemd:
- Podman's daemonless nature allows for native and direct integration with
systemd(the widely used Linux init system). - You can easily generate
systemdunit files for your containers and pods usingpodman generate systemd. This means you can manage your containers as regular system services, leveragingsystemd's robust features for:- Automatic startup on boot
- Restart policies
- Logging (
journalctl) - Dependency management
- Resource limits
- This makes Podman particularly well-suited for server environments where
systemdis prevalent.
- Podman's daemonless nature allows for native and direct integration with
-
Pod Concept (Kubernetes Alignment):
- Podman natively supports the concept of "pods," which are groups of one or more containers that share resources (like network namespace and storage volumes). This is directly analogous to Kubernetes pods.
- This makes Podman an excellent tool for local development and testing of multi-container applications that will eventually be deployed to Kubernetes, as it allows for a more accurate representation of the production environment.
- Podman can also generate Kubernetes YAML manifests from existing containers or pods using
podman generate kube, simplifying the transition from local development to Kubernetes deployments.
-
Modular Tooling (Buildah, Skopeo):
- Podman is part of a broader ecosystem of container tools developed by Red Hat (and the community):
- Buildah: Specifically designed for building OCI-compliant container images from Dockerfiles or other scripts. It offers more granular control over the image build process than
docker build. - Skopeo: A versatile tool for inspecting, copying, and signing container images directly between registries, without needing to run a daemon or even pulling the image to local storage.
- Buildah: Specifically designed for building OCI-compliant container images from Dockerfiles or other scripts. It offers more granular control over the image build process than
- This modular approach allows users to pick and choose the tools they need for specific tasks, promoting a more focused and flexible workflow. Docker, while powerful, is more of an "all-in-one" solution.
- Podman is part of a broader ecosystem of container tools developed by Red Hat (and the community):
-
No Vendor Lock-in (Open Source and OCI Compliant):
- Podman is entirely open-source and developed by Red Hat and the community.
- Its strict adherence to OCI standards ensures that images built with Buildah or Docker can be run by Podman, and vice versa. This provides flexibility and avoids reliance on a single vendor's specific implementation.
When might Docker still be preferred?
Despite Podman's advantages, Docker still holds significant market share and offers:
- More Mature Ecosystem and Community Support: Docker has been around longer, leading to a massive community, extensive documentation, and a vast array of third-party tools, integrations (like many CI/CD pipelines), and pre-built images on Docker Hub.
- Docker Desktop (for Windows/macOS): Docker Desktop provides a very polished and integrated experience for developers on non-Linux operating systems, including easy setup of Kubernetes and other features. While Podman Desktop exists and is improving rapidly, Docker Desktop is still often seen as more mature on these platforms.
- Docker Swarm: If you're using Docker Swarm for orchestration, Docker is the native choice (though Kubernetes is generally the preferred orchestration solution in modern environments).
In conclusion, Podman offers significant benefits in terms of security (especially rootless operations), system integration, and Kubernetes alignment due to its daemonless and pod-native architecture. For many Linux server deployments and Kubernetes-focused workflows, Podman is increasingly becoming the preferred choice. For general local development and environments heavily reliant on the existing Docker ecosystem, Docker remains a very strong contender.
podman machine start Starting machine "podman-machine-default"
This machine is currently configured in rootless mode. If your containers require root permissions (e.g. ports < 1024), or if you run into compatibility issues with non-podman clients, you can switch using the following command:
podman machine set --rootful
API forwarding listening on: /var/folders/by/qktzm3x508n2x21t0qxhn7br0000gn/T/podman/podman-machine-default-api.sock
The system helper service is not installed; the default Docker API socket address can't be used by podman. If you would like to install it, run the following commands:
sudo /opt/homebrew/Cellar/podman/5.7.1/bin/podman-mac-helper install
podman machine stop; podman machine start
You can still connect Docker API clients by setting DOCKER_HOST using the following command in your terminal session:
export DOCKER_HOST='unix:///var/folders/by/qktzm3x508n2x21t0qxhn7br0000gn/T/podman/podman-machine-default-api.sock'
Machine "podman-machine-default" started successfully
EditorConfig
.editorconfig is a configuration file used to define and maintain consistent coding styles across different editors and IDEs. It specifies rules for file formatting, such as indentation style, line endings, character encoding, and more. This helps ensure that all developers working on a project adhere to the same coding standards, regardless of their editor or IDE.
Common Settings in .editorconfig
# Top-most EditorConfig file
root = true

# Match all files
[*]
indent_style = space
indent_size = 4
end_of_line = lf
charset = utf-8
trim_trailing_whitespace = true
insert_final_newline = true

# Match Markdown files
[*.md]
trim_trailing_whitespace = false
Key Features
- Indentation: Specifies whether to use tabs or spaces and the size of the indentation.
- Line Endings: Defines whether to use
LF,CRLF, orCRfor line endings. - Character Encoding: Sets the file encoding, such as
utf-8. - Trailing Whitespace: Configures whether to trim trailing whitespace.
- Final Newline: Ensures a newline is added at the end of files.
Supported IDEs and Editors
Many popular IDEs and text editors support .editorconfig either natively or through plugins. Examples include:
- Visual Studio Code (via the EditorConfig extension)
- Visual Studio
- JetBrains IDEs (e.g., IntelliJ IDEA, WebStorm, PyCharm)
- Sublime Text
- Atom
- Eclipse
- Vim
- Emacs
- Notepad++
How It Works
When you open a file, the editor reads the .editorconfig file (starting from the file's directory and moving up the directory tree) and applies the specified settings to the file. This ensures consistent formatting across the project.
what is .editorconfig file?
An .editorconfig file is a configuration file that helps maintain consistent coding styles and formatting across multiple editors and IDEs. The file specifies a set of rules that define the coding style, such as indentation, line endings, and character encoding, for a particular project or codebase.
The .editorconfig file consists of sections that define different sets of rules for different types of files. For example, you can have a section for Python files that specifies the indentation size and another section for JavaScript files that specifies the line-ending style.
The file is named .editorconfig and is usually placed in the root directory of a project. When an editor or IDE opens a file, it looks for the .editorconfig file in the file's directory and applies the rules specified in the relevant section to the file.
EditorConfig is a widely adopted standard and is supported by many popular editors and IDEs, including Visual Studio Code, Atom, Sublime Text, and JetBrains IDEs.
EditorConfig is a tool that helps developers maintain consistent coding styles across different editors and IDEs. It uses a simple .editorconfig file to define a set of rules for code formatting, such as indentation style, line endings, and whitespace usage.
EditorConfig is a tool that helps developers maintain consistent coding styles across different editors and IDEs. It uses a simple .editorconfig file to define a set of rules for code formatting, such as indentation style, line endings, and whitespace usage.
To enforce the use of closing tags on single-line HTML elements in EditorConfig, you can use the following rule:
[*.html]
# Enforce closing tags on single-line elements
html_closing_singleline: require
In this example, the html_closing_singleline rule is set to require, which means that closing tags must be used on single-line HTML elements.
For example, with this rule enabled, the following HTML code would be formatted correctly:
<!-- This is correct -->
<div class="my-class">This is a div</div>

<!-- This is incorrect -->
<div class="my-class">This is a div</div>
<span class="my-class">This is a span</span>
Note that this rule is specific to EditorConfig and does not actually enforce any behavior in the HTML code itself. It is up to the developer to ensure that the HTML code adheres to the rules defined in the .editorconfig file.
Also note that this rule may conflict with ESLint's html/singleline-elements rule, which enforces a consistent style for HTML elements that are written on a single line. If you are using both EditorConfig and ESLint in your project, you may need to configure them to work together properly.
For HTML files, you can use the following EditorConfig settings to define the desired formatting rules:
# Indent with 2 spaces
[*.html]
indent_style = space
indent_size = 2

# Use LF line endings
[*]
end_of_line = lf

# Trim trailing whitespace
[*.{html,htm}]
trim_trailing_whitespace = true
In this example, the *.html section applies the indent_style and indent_size rules to HTML files. It specifies that indentation should use spaces instead of tabs, and that each level of indentation should be 2 spaces wide.
The [*] section applies the end_of_line rule to all files, specifying that line endings should use LF (Unix-style) instead of CRLF (Windows-style).
The [*.{html,htm}] section applies the trim_trailing_whitespace rule to HTML files, specifying that any trailing whitespace at the end of a line should be trimmed.
You can customize these settings to match your preferred coding style and formatting rules. You can also add additional rules and sections to the .editorconfig file to define formatting rules for other types of files, such as JavaScript or CSS.
Hardware Diagnostic Tests
hardware diagnostic tests
you can run to rule out hardware issues.
Memory diagnostic test: This test checks the RAM (Random Access Memory) on your computer for any errors or issues. On Windows, you can run the built-in "Windows Memory Diagnostic" tool by typing "mdsched.exe" into the search bar and following the prompts. On Mac, you can use the built-in "Apple Hardware Test" by restarting your computer and holding down the "D" key until the Apple Hardware Test screen appears.
Hard drive diagnostic test: This test checks the health and performance of your hard drive. Most hard drive manufacturers provide their own diagnostic software that you can download and use. For example, Seagate has "SeaTools" and Western Digital has "Data Lifeguard Diagnostic." These tools can scan your hard drive for errors and provide information about its health.
CPU stress test: This test puts your CPU under heavy load to check for stability and overheating issues. There are several free CPU stress test tools available, such as Prime95 and IntelBurnTest. These tools can stress-test your CPU for several hours to see if it can handle heavy workloads without crashing or overheating.
GPU stress test: This test puts your graphics card under heavy load to check for stability and overheating issues. There are several free GPU stress test tools available, such as FurMark and MSI Kombustor. These tools can stress-testyour graphics card for several hours to see if it can handle heavy workloads without crashing or overheating.
Power supply test: A failing power supply can cause all sorts of issues, including system crashes and instability. There are several tools that can help you test your power supply, such as a multimeter or a power supply tester. These tools can check the voltage output and stability of your power supply to see if it's functioning correctly.
It's important to note that running hardware diagnostic tests can be time-consuming and may require some technical knowledge. If you're not comfortable running these tests yourself, it may be best to take your computer to a professional technician who can diagnose and fix any hardware issues for you.
Troubleshooting Computer Fans
There could be several reasons why your desktop computer fan is getting loud even if it's not dusty or dirty. Here are a few possible explanations:
High CPU load: If your computer is running a lot of processes or programs that are using a lot of CPU resources, this can cause the fan to spin faster and make more noise. You can check the CPU usage in the Task Manager (on Windows) or the Activity Monitor (on Mac) to see if this might be the cause.
Failing fan: Even if the fan is not dirty, it could still be failing. Over time, fans can wear out and become less effective at cooling the system. If this is the case, you may need to replace the fan.
Malfunctioning temperature sensor: The fan in your desktop computer is designed to spin faster as the internal temperature of the system rises. If the temperature sensor is malfunctioning, it may be sending incorrect signals to the fan, causing it to spin faster than necessary.
Unoptimized fan curve: Some motherboards come with a "fan curve" that dictates how fast the fan will spin based on the temperature of the system. If this curve is not optimized for your specific system, it could be causing the fan to spin faster than necessary.
Other hardware issues: A noisy fan could also be a symptom of other hardware issues, such as a failing hard drive or a malfunctioning power supply.
These are just a few possible explanations for whyyour desktop computer fan is getting loud even if it's not dusty or dirty. To narrow down the cause, you can try monitoring the CPU usage and temperature, checking for any error messages or warnings in the system logs, and running hardware diagnostic tests to rule out any hardware issues. If you're not comfortable doing this yourself, it may be best to take your computer to a professional technician who can diagnose and fix the issue.