Node.JS
Table of Contents
Node.js has two distinct contexts within our organization it is used in development and build processes.
-
Backend Node.js: This is owned and managed by the Backend Engineering team. Their focus is on building and maintaining the servers, APIs, and business logic.
-
Frontend Tooling Node.js: This is owned and managed by the Frontend Engineering team. Their focus is on the client-side application, and they use Node.js as the platform to run their build tools, dependency manager, and development server.
-
Run the commands for development, testing, and building the production-ready static files.
-
Manage dependencies via npm (Node Package Manager).
-
Optionally serve the static files using a Node.js-based server (like Express) in production, though any static file server (e.g., Nginx, Apache) can be used.
Node.js is not required for the app to run in the browser once the static files are built and deployed, unless you use it to serve those files.
Overview
Node Js is one of the most popular and powerful server technologies today.
It allows you built the entire website only in one programming Language i.e Javascript. Node js is free and open source server technology that uses Javascript to create complete web software. It runs on various platforms like Windows, Linux, Unix, Mac OS X, etc.
-
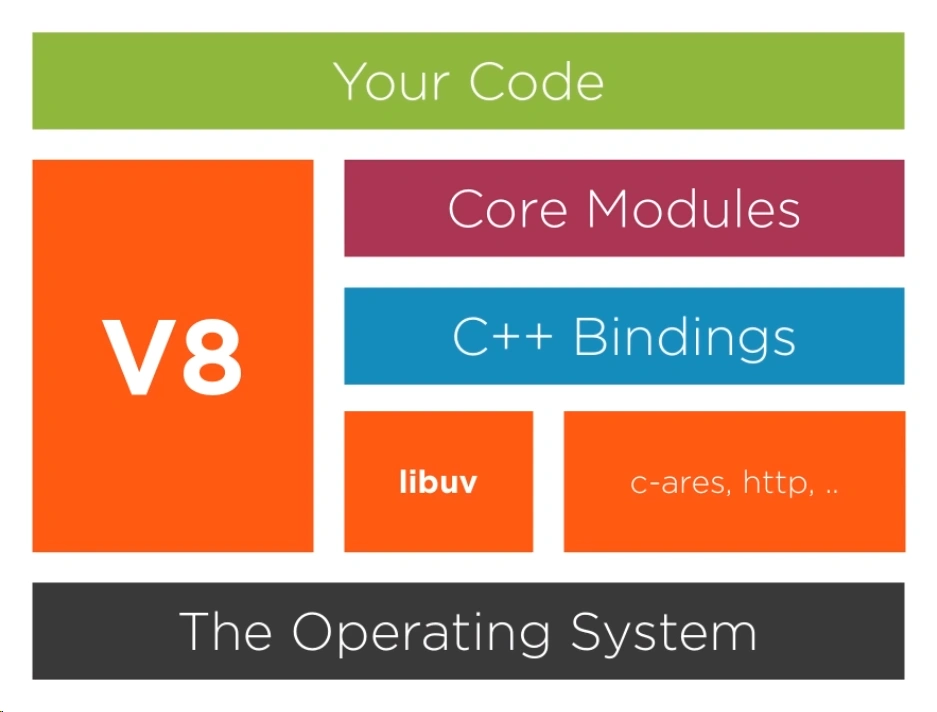
Node js is written in C, C++,JavaScript. It uses Google’s open source V8 Javascript Engine to convert Javascript code to C++.
-
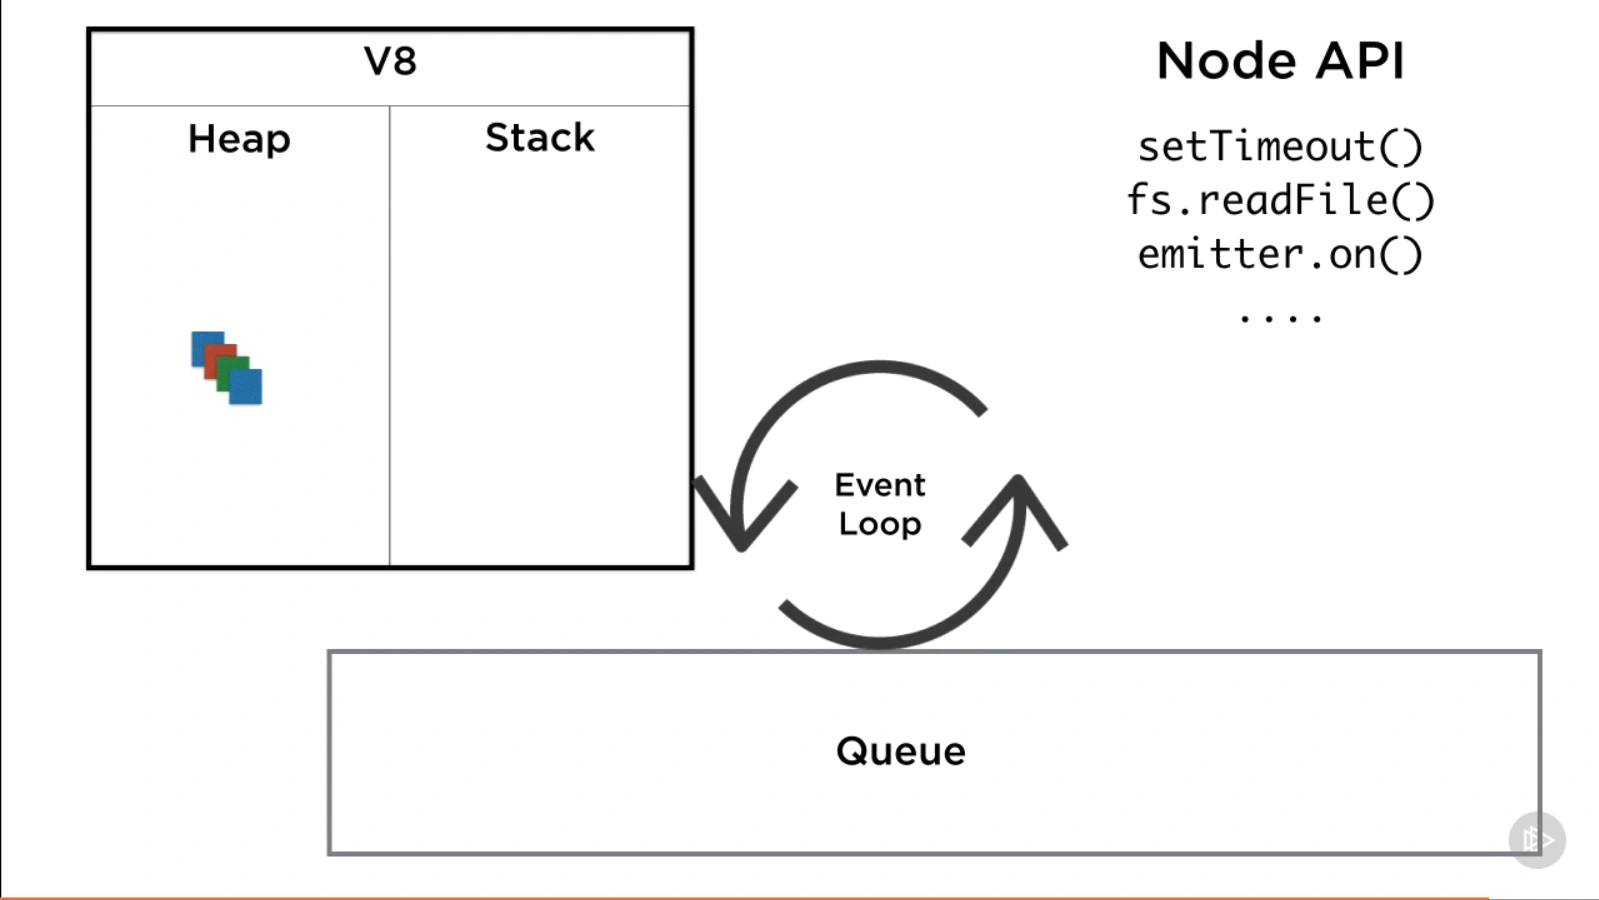
not designed for CPU intensive apps, optimized for data intensive and real time apps
-
non-blocking I/O
-
using single thread to
-
Requests are put in the event queue
-
Thread Pool
-
Asynchronous Callback
-
Node gyp
-
Node-sass
-
wrapper around v8 that executes JavaScript on the backend
-
built-in asynchronous (no threads) APIs, modules
-
CommonJS dependency manager
-
built to scale up
-
REPL
.help
.break
tab + tab
.editor
node-fetch

node-fetch is a module that allows you to make HTTP requests from Node.js using a fetch-like API. It provides a way to perform HTTP requests and handle responses in a convenient manner.
The node-fetch module is designed to mimic the functionality of the fetch API, which is commonly used in web browsers to make HTTP requests. It provides a similar syntax and behavior, making it easy to use and understand if you are already familiar with fetch.
Here are some key features of node-fetch:
-
Simplified HTTP requests:
node-fetchsimplifies the process of making HTTP requests by providing a simple and intuitive API. You can use it to send requests to remote servers, fetch data from APIs, and handle the responses. -
Promises-based approach:
node-fetchuses the Promises pattern, allowing you to handle asynchronous operations in a more elegant and readable way. You can useasync/awaitor.then()to handle the response and perform further actions. -
Support for different request methods:
node-fetchsupports various HTTP methods such as GET, POST, PUT, DELETE, etc. You can specify the method you want to use when making a request. -
Customizable request headers: You can set custom headers for your requests, including common headers like Content-Type, Authorization, etc.
-
Streaming support:
node-fetchsupports streaming of request and response bodies, allowing you to handle large amounts of data efficiently.
node-fetch is commonly used in Node.js applications when server-side HTTP requests need to be made, such as interacting with RESTful APIs, fetching data from remote servers, or performing web scraping tasks.
To use node-fetch, you need to install it as a dependency in your Node.js project. You can do this by running the following command:
npm install node-fetch
After installation, you can import the node-fetch module in your code and start making HTTP requests using its API.
ts-node
ts-node is a TypeScript execution and REPL (Read-Eval-Print Loop) for Node.js. It allows you to directly run TypeScript code without explicitly compiling it to JavaScript. With ts-node, you can write and execute TypeScript code seamlessly within a Node.js environment.
Here are some key features and uses of ts-node:
-
On-the-fly TypeScript compilation:
ts-nodecompiles TypeScript code on-the-fly, eliminating the need for a separate build step. It transparently compiles TypeScript files and executes them directly using the TypeScript compiler API. -
Fast startup: Since
ts-nodecompiles TypeScript code just-in-time, it provides faster startup times compared to pre-compiling TypeScript to JavaScript before running. -
Improved development workflow:
ts-nodesimplifies the development workflow by allowing you to write and test TypeScript code directly without worrying about manual compilation. It provides a smoother development experience, especially during rapid prototyping and scripting tasks. -
Support for TypeScript features:
ts-nodesupports the full range of TypeScript language features, including advanced type checking, decorators, async/await, and other ECMAScript features that TypeScript provides. -
Integration with Node.js APIs:
ts-nodeseamlessly integrates with Node.js APIs, allowing you to use Node.js modules and libraries in your TypeScript code without any additional setup. -
REPL (Read-Eval-Print Loop) mode:
ts-nodeprovides a REPL mode that allows you to interactively execute TypeScript code. It can be useful for experimenting with TypeScript syntax, exploring APIs, or quick prototyping.
To use ts-node, you need to install it as a development dependency in your Node.js project. You can do this by running the following command:
npm install ts-node --save-dev
Once installed, you can run TypeScript files directly using the ts-node command followed by the name of the TypeScript file. For example:
ts-node myfile.ts
ts-node will automatically compile the TypeScript code and execute it using the Node.js runtime.
Note that ts-node is primarily intended for development and debugging purposes. In production environments, it is recommended to compile TypeScript code to JavaScript using the TypeScript compiler (tsc) and run the resulting JavaScript files directly with Node.js.
--verbose
Make Verbose Default
npm config set loglevel verbose
flag
Delete cache (both commands are same)
npm cache clean --force
npm cache clear --force
flush DNS Mac
sudo dscacheutil -flushcache
old project doesn't run
add npm-shrinkwrap.json file for backwards compatibility then re-run npm install
--legacy-peer-deps restores peerDependency installation behavior from NPM v4 thru v6
The --legacy-peer-deps flag was introduced with v7 as a way to bypass peerDependency auto-installation; it tells NPM to ignore peer deps and proceed with the installation anyway. This is how things used to be with NPM v4 thru v6.
npm ci clean install