Express JS
Overview
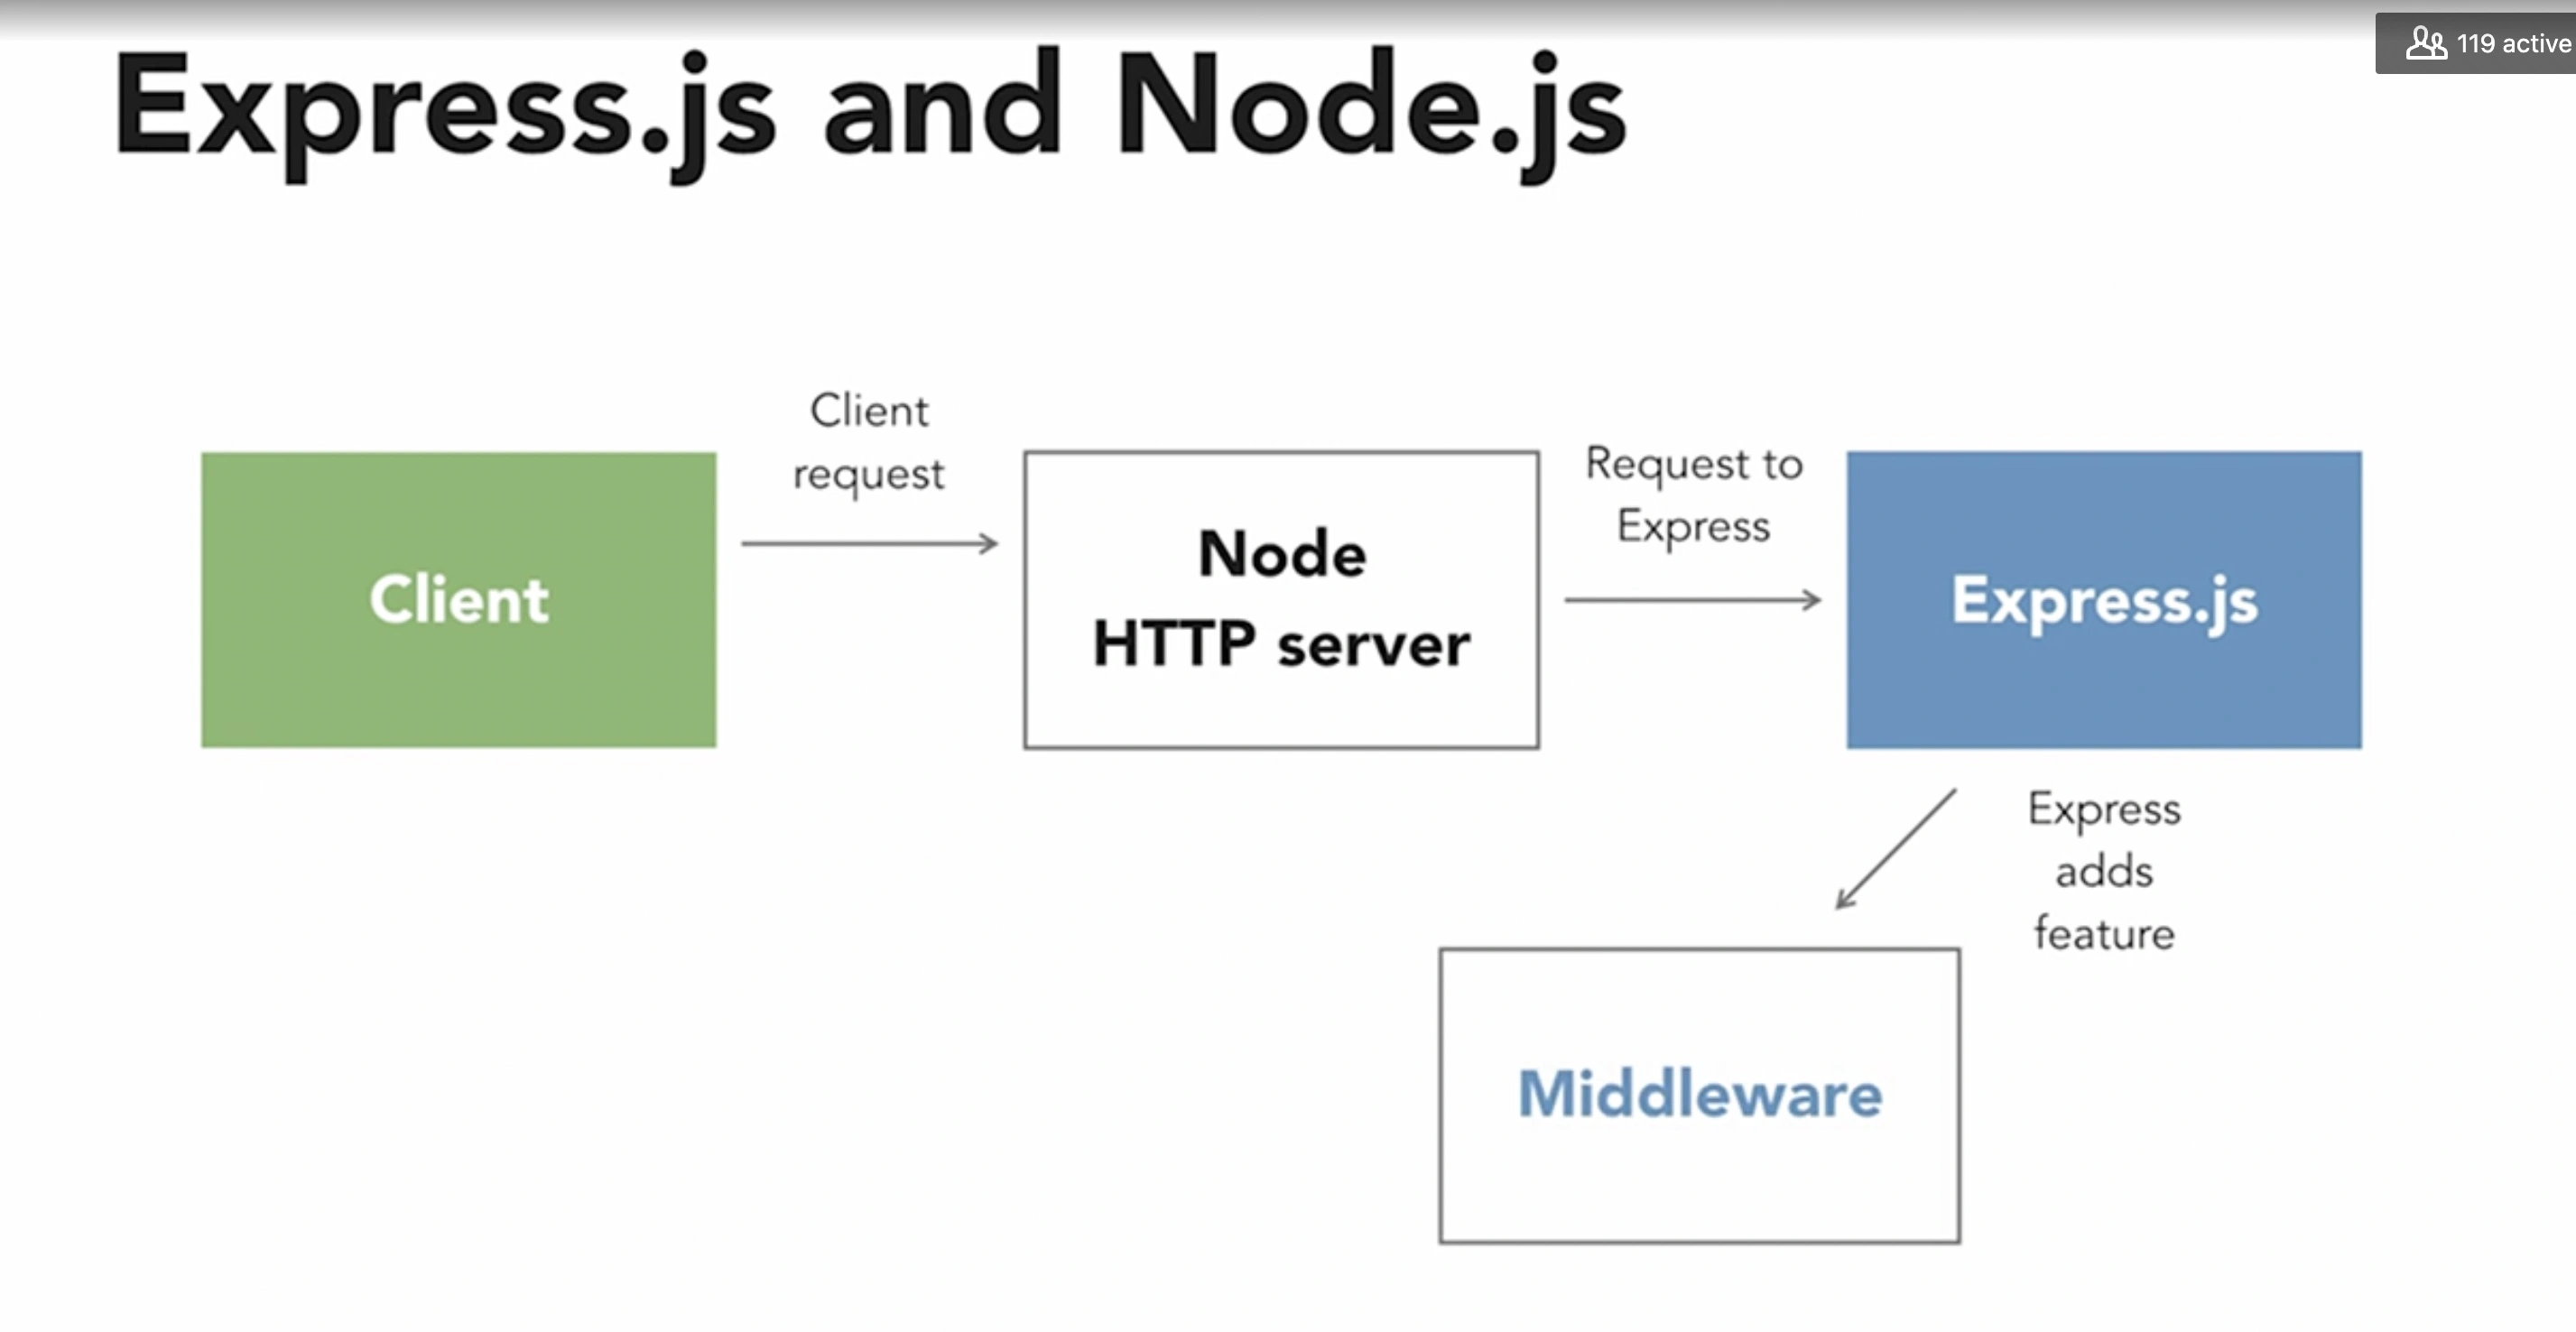
Express.js is a lightweight web application which helps in organizing the web application into MVC architecture on the server side.
const express = require("express");

const app = express();

app.get("/", (req, res) => {
  res.send("yo");
});

app.listen(PORT, () => {
  console.log(`Server is running on port \\${PORT}`);
})
- flexible
- minimal
- It is used for setting up middlewares so as to provide a response to the HTTP or RESTful requests.
- With the help of express JS, the routing table can be defined for performing various HTTP operations.
- It is also used for dynamically rendering HTML pages which are based on passing arguments to the templates.
- It provides each and every feature which is provided by core Node JS.
- The performance of Express JS is adequate due to the presence of a thin layer prepared by the Express JS.
- It is used for organizing the web applications into the MVC architecture.
- Everything from routes to rendering view and performing HTTP requests can be managed by Express JS.
Anatomy of an Express Application
A typical structure of an Express server file will most likely contain the following parts:
- node.js project architecture
- Service Layer
- Pub/Sub Layer
- https://www.freecodecamp.org/news/express-explained-with-examples-installation-routing-middleware-and-more/
- https://www.freecodecamp.org/news/the-express-handbook/
template engines
const fs = require('fs');
const util = require('util');

const fsReadFile = util.promisify(fs.readFile);

app.engine('md', async(filePath, options, callback) => {
  try {
    const content = await fsReadFile(filePath);
    const rendered = content.toString().replace('{headline}', options.headline);

    return callback(null, )
  } catch(err) {
    return callback(err);
  }
});

app.set('views', 'views');
- Routing
- The Application Object
- When Your middleware needs to make an
isAuthorizedflag available to subsequent middleware in the chain. SetisAuthorizedproperty on thereqobject. - Express will look for files to serve in
app.use('/static', express.static('public'))in thepublicsubdirectory of the directory from which the Node process was launched - response local variables located in
res.locals app.use()to mount one Express app on another- Express look for views by default in the
viewsdirectory in the application root directory
Setup Steps
Following are the steps used to set up an express JS application: –
- A folder with the same name as the project name is created.
- A file named package.json is created inside the folder created.
- “npm install” command is run on the command prompt. It installs all the libraries present in package.json.
- A file named server.js is created.
- “Router” file is created inside the package which consists of a folder named index.js.
- “App” is created inside the package which has the index.html file.
- This way, an express JS application is set up.

Express.js is based on the Node.js middleware module called connect which in turn uses http module. So, any middleware which is based on connect will also work with Express.js.
- app.get()
- app.route()
- HTTP Verbs
- app.engine
- app.render
- Headers
- router.use()
- Route Parameters
- Query Parameters
Application Generator
npm i -g express-generator
express -h
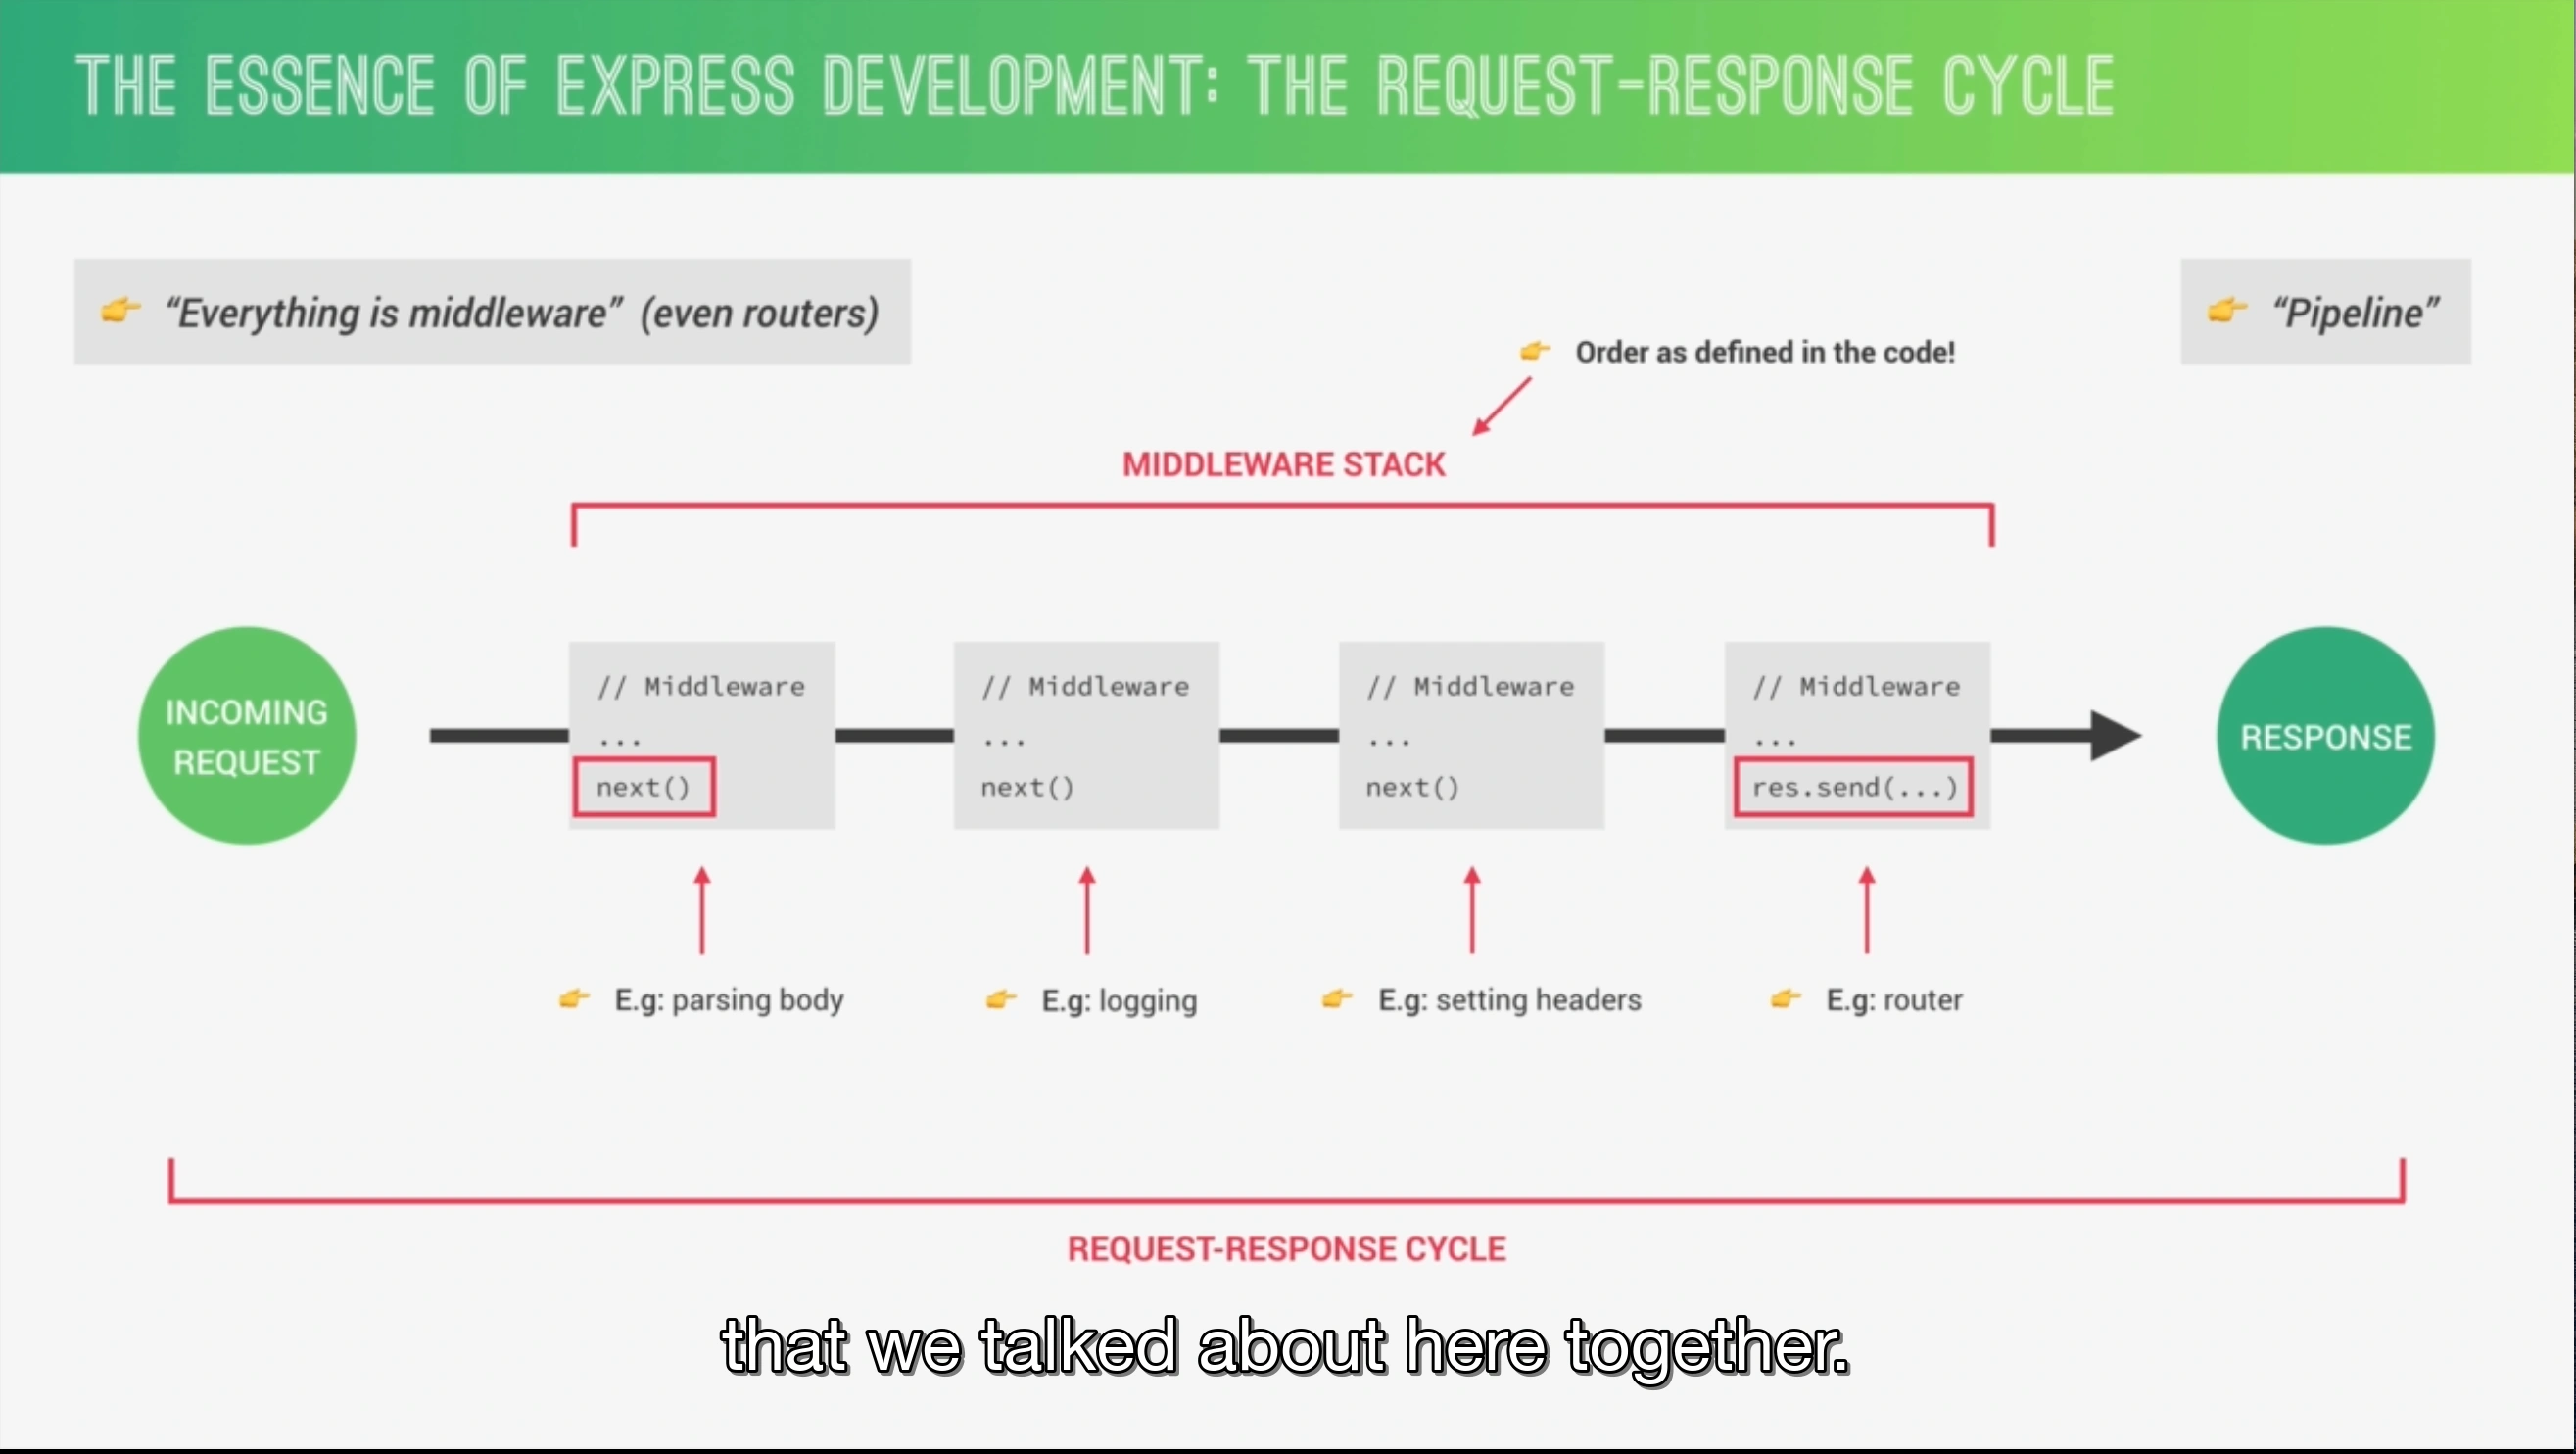
Middleware
functions that can: Execute any code, Make changes to the request and the response objects, End the request-response cycle, Call the next middleware in the stack. Middleware is executed in the same order that it was enabled
In the context of a GET request to a MySQL database in Express.js, the req and res parameters have specific use cases:
-
req(Request object): Thereqobject represents the HTTP request made by the client to the server. It contains information about the request, such as the URL, query parameters, headers, cookies, and any data sent in the request body (although GET requests typically don't have a request body). Here are some common use cases forreq:-
Accessing query parameters: In a GET request, query parameters are typically sent as part of the URL. You can access these parameters using
req.query. For example, if the URL is/addrhyme?id=123, you can access theidparameter usingreq.query.id. -
Retrieving request headers: You can access the request headers using
req.headers. This can be useful for authentication, authorization, or retrieving additional information about the client's request. -
Handling cookies: If you're using cookies to manage sessions or store client-side data, you can access them through
req.cookies(if you're using a cookie parsing middleware likecookie-parser). -
Validating and processing input: You can validate and process the request data, such as checking if required parameters are present or performing data transformations, before interacting with the database.
-
-
res(Response object): Theresobject represents the response that will be sent back to the client. It provides methods and properties to control the response, including setting headers, sending data, and handling errors. Here are some common use cases forres:-
Sending a response: You can use
res.send()to send a simple response back to the client. For example,res.send("Rhyme 2 added")sends the string "Rhyme 2 added" as the response body. -
Setting response headers: You can set the response headers using
res.setHeader(),res.set(), or the shortcut methods likeres.contentType()orres.status(). This allows you to control cache settings, content type, or other response-specific headers. -
Sending JSON data: If you want to send JSON data as the response, you can use
res.json()to automatically convert JavaScript objects or arrays into JSON and send it to the client. -
Handling errors: If an error occurs while processing the request or interacting with the database, you can use
res.status()andres.send()to send an appropriate error response back to the client. For example,res.status(500).send("Internal Server Error")sends a 500 status code and the error message "Internal Server Error". -
Redirecting: You can use
res.redirect()to redirect the client to a different URL. This can be useful for implementing authentication or handling certain client-side actions. -
Streaming responses: If you need to send a large amount of data or stream data in chunks, you can use the streaming capabilities of
resto send the response in chunks rather than waiting for the entire response to be ready.
-
These are some of the common use cases for req and res in GET requests to a MySQL database using Express.js. Remember to handle errors gracefully and ensure appropriate data validation and security measures are in place when interacting with the database.
- body-parser: parse HTTP request body
- compression: compress HTTP responses
- cookie-parser: parse cookie header and populate req.cookies
- multer: handle multipart form data
- serve-favicon: serve a favicon
- session:
- helmet: secure HTTP headers
body parser
In Express.js, req.body is an object containing the parsed data from the body of the request, which is submitted through a POST or PUT request. This data is typically used for creating or updating resources on the server.
For req.body to be populated, you need to use middleware that parses the incoming request body. Express.js does not include a body-parsing middleware in its core, so you often see express.json() and express.urlencoded({ extended: true }) used for this purpose. These are built-in middleware functions in Express that parse incoming requests with JSON payloads and URL-encoded payloads, respectively.
Here's how you might include these middleware in your Express application to ensure req.body is populated:
In Express, body-parser is a middleware that allows you to extract the entire body portion of an incoming request stream and exposes it on the req.body property. It simplifies the process of parsing the request body, especially when dealing with data sent in JSON, URL-encoded, or multipart form formats.
To use body-parser with Express, you need to install it as a dependency by running npm install body-parser. Once it's installed, you can require it in your Express application as follows:
const express = require('express');
const bodyParser = require('body-parser');

const app = express();

// Middleware setup
app.use(bodyParser.json()); // for parsing application/json
app.use(bodyParser.urlencoded({ extended: true })); // for parsing application/x-www-form-urlencoded

// Routes and other middleware...

// Start the server
app.listen(3000, () => {
  console.log('Server is running on port 3000');
});
In the code snippet above, we require body-parser and set it up as middleware using app.use(). We configure two parsers: bodyParser.json() to parse JSON data and bodyParser.urlencoded() to parse URL-encoded data.
Now, whenever a request hits your Express server, body-parser will examine the Content-Type header of the request and parse the body accordingly. The parsed body will be available on the req.body property for further processing within your route handlers.
For example, if a client sends a JSON payload in a POST request, you can access the parsed JSON data in your route handler like this:
app.post('/api/users', (req, res) => {
  const user = req.body; // Parsed JSON data
  // Process the user data...
});
Similarly, if the client sends data in URL-encoded format, you can access it in the same way.
body-parser supports various other options and configurations to handle different types of data and customize its behavior. You can refer to the body-parser documentation for more details on advanced usage and available options.
the .use() method
In ExpressJS, the .use() method is a way to set up middleware functions that your application can use. Middleware functions have access to the request object (req), the response object (res), and the next middleware function in the application’s request-response cycle. These functions can execute any code, make changes to the request and the response objects, end the request-response cycle, and call the next middleware function. If not, they can halt the cycle by not calling next(). The .use() method is commonly used for:
-
Application-Level Middleware: By calling
app.use(), you can bind middleware to your application. This is useful for tasks that need to be done on every request, such as:- Logging: Recording details of requests and responses for debugging.
- Body Parsing: Parsing the body of incoming requests. In the provided code,
express.json()andexpress.urlencoded({extended : true})are used for parsing JSON and URL-encoded data, respectively. - CORS (Cross-Origin Resource Sharing): Allowing or restricting requested resources on a web server based on where the HTTP request was initiated. This is evident in the custom middleware that sets CORS headers.
- Authentication: Checking if a user is authenticated before allowing access to certain routes. Although commented out,
checkIfAuthenticatedis an example of this.
-
Router-Level Middleware: Similar to application-level middleware but bound to an instance of
express.Router(). This is useful for creating modular, mountable route handlers. ARouterinstance is a complete middleware and routing system; thus,app.use("/path", routerInstance)is used to handle all requests to a particular path with the specified router. In the provided code,wordRoute,randomRoute, andrhymeRouteare examples of router-level middleware that handle requests to/words,/random, and/rhymepaths, respectively. -
Error-Handling Middleware: Express allows you to define error-handling middleware functions in the same way as other middleware, but with four arguments instead of three, specifically with the signature
(err, req, res, next). This is used to catch and handle errors that occur during the handling of requests. -
Built-in Middleware: Express has several built-in middleware functions like
express.static,express.json, andexpress.urlencodedthat can serve static files, parse JSON requests, and handle URL-encoded data, respectively. -
Third-Party Middleware: You can also use third-party middleware to add functionality to Express apps. For example,
corsis a third-party middleware used to enable CORS with various options.
In summary, the .use() method is crucial for setting up middleware in Express applications, enabling developers to implement functionalities such as logging, body parsing, authentication, and more, in a modular and efficient manner.
Request
- req.secure
- Request API
- .get
- .is
- .params
- .ip
- req.cookies
- req.body
Request Parameters
In ExpressJS, the colon (:) in a route path is used to define a route parameter. Route parameters are named URL segments that are used to capture the values specified at their position in the URL. The captured values are populated in the req.params object, with the name of the route parameter specified in the path as their respective keys.
HTTP Response
res.setHeader() allows you only to set a singular header and res.header() will allow you to set multiple headers. So use the one fit with your needs.
- Response API
- res.locals: a list of variables and values that can be used when rendering views
- res.json
- res.set
- res.append
- res.render
- res.redirect
- res.location
app.use(express.json());

app.use((req, res, next) => {

}
Try / Catch Blocks
Express.js try / catch blocks are used to handle errors in Express.js applications.
- The try block contains the code that could potentially throw an error.
- The catch block contains the code that will be executed if an error is thrown.
These feature allow developers to handle errors gracefully and prevent the application from crashing.
Bootstrapping Server
The last that gets executed in an Express server is the app.listen() function which starts our server.


- HTTP handshake
- HTTPS negotiation steps
- Request - Response vs Pub - Sub
- can return JSON, image file, HTML file, etc
- or could return a response code like 200s, 300s, or 400s
Best Practices
Inefficient code may increase costs
- NODE_ENV
Use TypeScript
When working with Express.js and TypeScript, there are several best practices you can follow to improve your development process and maintain a clean and robust codebase. Here are some key best practices to consider:
- Use TypeScript: TypeScript brings static typing to JavaScript, providing improved tooling, autocompletion, and type safety. Initialize your project with TypeScript by running
npm init --yesfollowed bynpm install express typescript @types/express.
Configure TypeScript
Create a tsconfig.json file in your project's root directory to configure TypeScript. Enable strict mode and set the target and module options appropriately for your project. For example:
{
  "compilerOptions": {
    "target": "es2020",
    "module": "commonjs",
    "strict": true,
    "esModuleInterop": true,
    "outDir": "dist"
  },
  "include": ["src"],
  "exclude": ["node_modules"]
}
Use Strong Typing
Leverage TypeScript's type system to provide strong typing for your Express.js application. Define interfaces or types for your request and response objects, middleware functions, and route handlers. This helps catch errors early and improves code readability. For example:
import { Request, Response, NextFunction } from 'express';

interface User {
  id: number;
  name: string;
}

app.get('/users/:id', (req: Request, res: Response) => {
  const userId: number = parseInt(req.params.id);
  // ...
});

app.post('/users', (req: Request, res: Response) => {
  const user: User = req.body;
  // ...
});

app.use((err: Error, req: Request, res: Response, next: NextFunction) => {
  // ...
});
Use Middleware
Break down your application logic into modular middleware functions to enhance code reusability and maintainability. Middleware functions can handle common tasks such as authentication, error handling, logging, etc. Use the NextFunction parameter to pass control to the next middleware or route handler. For example:
const loggerMiddleware = (req: Request, res: Response, next: NextFunction) => {
  console.log(`\\${req.method} \${req.url}`);
  next();
};

app.use(loggerMiddleware);
Error Handling
Implement centralized error handling to provide consistent error responses across your application. Use custom error classes and middleware to handle different types of errors. For example:
class UnauthorizedError extends Error {
  constructor(message: string) {
    super(message);
    this.name = 'UnauthorizedError';
  }
}

const errorHandlerMiddleware = (err: Error, req: Request, res: Response, next: NextFunction) => {
  if (err instanceof UnauthorizedError) {
    res.status(401).json({ error: err.message });
  } else {
    res.status(500).json({ error: 'Internal Server Error' });
  }
};

app.use(errorHandlerMiddleware);
Modularize Routes
As your application grows, separate your routes into individual modules for better organization and maintainability. Create separate files for different sets of routes and use the Express Router to define and export them. For example:
// usersRoutes.ts
import { Router, Request, Response } from 'express';

const router = Router();

router.get('/', (req: Request, res: Response) => {
  // ...
});

router.post('/', (req: Request, res: Response) => {
  // ...
});

export default router;

// index.ts
import usersRoutes from './routes/usersRoutes';

app.use('/users', usersRoutes);
Validation
Implement input validation to ensure data integrity and security. You can use libraries like express-validator to validate request bodies, query parameters, and headers. For example:
import { body, validationResult } from 'express-validator';

app.post('/users', [
  body('email').isEmail(),
  body('password').isLength({ min: 6 }),
], (req: Request, res: Response) => {
  const errors = validationResult(req);
  if (!errors.isEmpty()) {
    return res.status(400).json({ errors: errors.array() });
  }
  // ...
});
These are some of the best practices when working with Express.js and TypeScript. Following these practices can help you write clean, maintainable, and type-safe code. Remember to adapt them to your project's specific requirements and preferences.
Typescript Interfaces
In Express.js API projects, TypeScript interfaces are used to define the shape of data objects, request bodies, and responses. This helps in ensuring type safety and improving code readability and maintainability. Here's how you can use interfaces in an Express.js project:
1. Define Interfaces for Data Models
Suppose you have a user model; you can define an interface for it:
// models/user.ts
export interface User {
  id: string;
  name: string;
  email: string;
}
2. Use Interfaces in Route Handlers
You can use these interfaces in your route handlers to ensure the objects you're working with conform to the expected structure.
import express, { Request, Response } from 'express';
import { User } from './models/user';

const app = express();
app.use(express.json());

app.post('/users', (req: Request, res: Response) => {
  const newUser: User = req.body;
  // Now you can be sure newUser has id, name, and email fields
  // Do something with newUser, like saving to a database
  res.status(201).send(newUser);
});
3. Define Interfaces for Request Bodies
For more complex scenarios, especially when not all fields of a model are required or additional fields are needed, you can define specific interfaces for request bodies.
// interfaces/userRequests.ts
export interface CreateUserRequest {
  name: string;
  email: string;
}
Then, use this interface in your route handler:
import express, { Request, Response } from 'express';
import { CreateUserRequest } from './interfaces/userRequests';

const app = express();
app.use(express.json());

app.post('/users', (req: Request, res: Response) => {
  const newUser: CreateUserRequest = req.body;
  // Handle the creation logic
  res.status(201).send(newUser);
});
4. Middleware and Custom Request Types
You can also extend Express's Request type for middleware that adds properties to the request object.
import { Request, Response, NextFunction } from 'express';

interface CustomRequest extends Request {
  user?: User; // Assuming User is an interface you've defined
}

const authenticate = (req: CustomRequest, res: Response, next: NextFunction) => {
  // Authentication logic here
  // If authenticated:
  req.user = { id: '123', name: 'John Doe', email: '`john@example.com`' };
  next();
};
5. Response Interfaces
Similarly, you can define interfaces for your API responses to ensure consistency across your application.
// interfaces/apiResponses.ts
export interface ApiResponse<T> {
  data: T;
  message?: string;
}
Use this interface to type your responses:
app.get('/users/:id', (req: Request, res: Response) => {
  const user: User = findUserById(req.params.id); // Assuming this function exists
  const response: ApiResponse<User> = { data: user };
  res.send(response);
});
Using interfaces in your Express.js project with TypeScript not only helps with type checking but also serves as documentation for your code, making it easier to understand and maintain.
Use Chalk
In the context of building REST APIs with Express.js, Chalk is a popular JavaScript library used for styling and adding colors to the console output. It provides a convenient way to format and enhance the appearance of the text that is logged to the console during the development and debugging process.
const chalk = require("chalk");

app.listen(port, () => {
  console.log(`Running on port \\${chalk.green(port)}`);
});
While Chalk is not specific to Express.js or REST APIs, it can be particularly useful when working with Express.js because it allows developers to highlight important information, differentiate between different types of messages, and make the console output more readable and visually appealing.
Here are a few use cases for Chalk in an Express.js REST API project:
-
Logging and debugging: When you're developing an Express.js application, you often need to log messages to the console for debugging purposes. Chalk provides various formatting options, such as changing the text color, background color, or applying styles like bold or underline, which can help you distinguish between different types of log messages. For example, you can use different colors for success messages, error messages, warnings, or informational logs.
-
Request/response logging: In a REST API, it's common to log information about incoming requests and outgoing responses. Chalk can be used to highlight specific details like HTTP methods, request URLs, status codes, and response bodies. By applying different colors or styles to different parts of the log message, you can make it easier to quickly identify and understand the relevant information.
-
Status indicators: Chalk can be useful for creating status indicators or progress bars in the console. For example, you can use different colors to represent different stages of an API request or processing workflow. This can be especially helpful when dealing with long-running operations or asynchronous tasks that need to provide real-time updates to the console.
-
Error handling: When handling errors in an Express.js REST API, Chalk can help you present error messages in a more prominent and visually appealing way. You can use colors like red to make error messages stand out, or apply specific styles to differentiate between different types of errors.
Overall, Chalk is a versatile library that can enhance the readability and aesthetics of console output in an Express.js REST API project. It allows you to add color and style to your logs, making it easier to understand and debug your application.
Logger
index.js
const bunyan = require('bunyan);

const loggers = {
  development: () => bunyan.createLogger({ name: 'development', level: 'debug' }),
  production: () => bunyan.createLogger({ name: 'production', level: 'info' }),
  test: () => bunyan.createLogger({ name: 'test', level: 'fatal' }),
}
use npm i --save bunyan for logging since console.log is bad